Reptile Eye tutorial.
This is tutorial for Gimp version 2.10.30
Reptile eye.
Hence trying to write tutorial beginner friendly as much as possible here is an image of areas I will be referring to. To zoom in and out of canvas hold down ctrl+scroll wheel. While zoomed in, to navigate left and right hold down shift+scroll wheel. Up and down just scroll wheel. Or just use scroll bars.

Step 1.
- Fire up Gimp, Menu-File-New, or shortcut Ctrl+N. In pop up enter 256 image size for x and y.
- In the layer dialogue box there will be new layer called Background. We will leave it as is. Save your work. Menu-File-Save as. When choosing this option Gimp will save file as .xcf. It is nice, because all layers will be saved and can always adjust them. In order to save image using different extension Menu-File-Export as. In pop up window below will be + sign. Click on it and choose extension desired. For now we will work with .xcf.
- Create new layer. Menu-Layers-New or Shift+Ctrl+N shortcut. In pop up make sure Fill with is set to transparency. By default it should be just that.
- Navigate to layer dialog box, rename newly created layer to EyeSize by double clicking on the text next to it. As soon it highlights start typing and then hit enter. It will be positioned above Background.

In Tools find rectangle select tool and we need to change it to ellipse select. Either right click on it and choose Ellipse from drop down or use E key.

In Tool Options put check mark next to Fixed. Drag on canvas to start selection. And then in Tool Options since ratio is set to fixed enter 240 for either width or height size. Put 8 pixels for position. So we will have perfect circle in the center of canvas.
- In Tool Options navigate to bucket fill tool. Make sure in color pick foreground is set to black HTML notation 000000 by default it should be just that and fill circle selection with black color then deselect. Menu-Select-None or Shift+Ctrl+A shortcut.
- Now we need to create actual iris texture. Create new transparent layer. Menu-Layers-New layer. Rename it to IrisTexture.

Set foreground color to HTML notation 67310d. I wanted it orangy but you can choose whatever color. With IrisTexture layer selected fill canvas with color.
- Create new layer and name it GreyNoise.
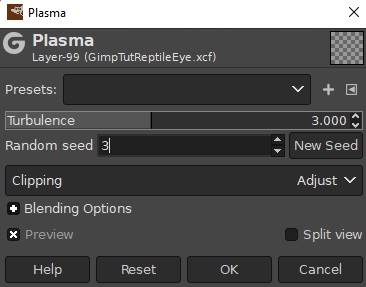
With GreyNoise layer selected, Menu-Filters-Render-Noise-Plasma. In pop up enter 3 for Turbulence and Random seed.

With GreyNoise layer selected Menu-Colors-Desaturate-Desaturate. And in pop up set mode to Average (HSI Intensity).

Menu-Filters-Distorts-Whirl and Pinch. In pop up 30 for Whirl, 0.800 for Pinch and 1.200 for Radius.
- Create another layer and we won't give it name. So, by default it will be called Layer.

With new layer selected Menu-Filters-Render-Noise-Solid Noise. Enter 5 for X and Y, Detail 3 and 3 for Random seed.
- Duplicate layer Layer. In layer dialog box right click on it and choose duplicate from drop down menu. By default duplicate will be called Layer copy. In layer dialog box set Layer copy to mode Difference (don't panic when layer turns black!) and then head to Menu-Colors-Invert.

Menu-Colors-Levels. In pop up enter 39 for low input, 0.76 for Gamma and 215 for High input. And we don't need to worry about rest of values.
- In layer dialog box merge Layer copy (right click-drop down-merge down) into Layer.
- Set Layer to mode Difference.
- With Layer selected, Menu-Colors-Invert.
- Menu-Layers-Transform-Rotate 90 Counter clock wise.
- Merge Layer into GreyNoise.
- GreyNoise layer selected, Menu-Colors-Invert.
- Set GreyNoise layer to mode Soft Light.
- If you planning to keep making all sort of different color eyes, it would be good idea to duplicate GreyNoise layer. I did just that and renamed dublicate to GreyNoiseKeep. In layers dialog box click eye icon next to GreyNoiseKeep layer to hide it. Then move layer down in the stack, so it appears under original Background layer. To move selected layer in the stack, way down in layers dialog box, use up and down arrows.
This is what we have so far.

Step 2
- Create new layer and name it IrisRim since we need one.
- Select bucket fill tool. Set foreground color to black HTML notation 000000 then fill canvas with that color.
- In layer dialog box select EyeSize layer then Menu-Select-By Color. Touch canvas roughly in the middle so you see selection made (marching ants circle) and then select IrisRim layer again.
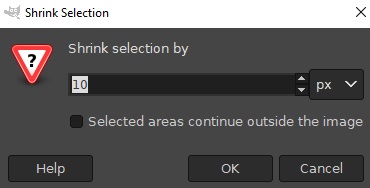
With IrisRim layer selected Menu-Select-Shrink and in pop up enter 10.
- Then Menu-Edit-Clear or use delete key on keyboard.. Then deselect all. Either Menu-Select-None or Shfit+Ctrl+A shortcut.

We are going to blur edges a bit. Menu-Filters-Blur-Gaussian Blur and in pop up enter 3 for X and Y size.
- Create new layer and call it Pupil. Reptile pupil can be all sorts of shapes but for this tutorial we just make it simple ellipse shape.
- In layer dialog box select EyeSize layer then Menu-Select-By Color. Touch canvas roughly in the middle so you see selection made (marching ants circle) and then select Pupil layer again.

In Tool box navigate and select Ellipse select tool. Uncheck Fixed for Aspect Ratio. Then touch inside marching ants circle on canvas. You will see handles appear and we can scale selection with out losing center. So create pupil shape or here are my presets. 32 for width and 170 for hight. Position X 112 and Y 43.
Once happy, fill selection with black color. Then deselect all.
Create new layer and name it IrisHighlight. Move IrisHighlight layer (up down arrows at the very bottom of layer dialog box) down. So it is under IrisRim but above GreyNoise.
- Select EyeSize layer and Menu-Select-By Color. Then touch canvas roughly in the middle so circle is selected.
- Select IrisHighligh layer again and navigate to Ellipse select tool in Tool box.

Touch inside selection on canvas so we get handles and now we need to adjust them to something like this. Set foreground color to white HTML notation ffffff and using bucket fill tool fill selection.
Or type in parameters in Tool options for Ellipse tool.
Size: Width -164, Height -200.
Position, X - 47 and Y – 28.

Now we need to delete center. So, grab on to handles and position them to something like this.
Or enter parameters in Tool options for Ellipse tool.
Size: Width – 84, Height – 174.
Position: X – 86, Y – 41.
Delete center. Menu-Edit-Clear or delete key. Deselect all. Shift+Ctrl-A or Menu-Select-None.
- We need to select eye size again. Select EyeSize layer, Menu-Select-By Color. Select eye size circle and select IrisHightlight layer again.
- Menu-Filters-Blur-Zoom Motion Blur. In pop up enter 180 for Blurring factor.
- Deselect all.
- Set IrisHighligth layer mode to Overlay.
- And we are going to make pupil highlight also. Create new layer, name it PupilHighlight and move it so it is above IrisHighlight. Set PupilHighlight layer to mode Overlay.
- Select layer Pupil. Menu-Select-By Color. Touch pupil so we see marching ants around it.
- Select layer PupilHighlight. Menu-Select-Grow and enter 2 pixels in pop up.
- Grab bucket fill tool and fill selection with white color.
- Deselect all.
- Menu-Filters-Blur-Gaussian and leave presets as is in pop up, hit ok.
- By the way we don't need layer Background so just delete it.
- Save your work Ctrl S or Menu-File-Save.
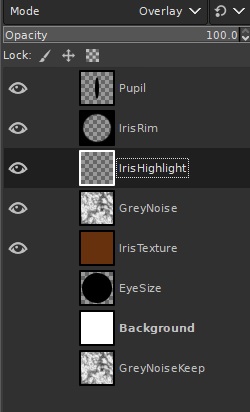
- We should have in total 8 layers. EyeSize and GreyNoiseKeep layers are hidden.
- And we are done!. To save image on transparent background as png for example, in layer dialog box right click on any visible layer and choose from drop down Merge Visible layers. In pop up leave presets as is. Everything will be merged onto last visible layer. It should be called IrisTexture. Do not save .xcf file after merging step, so we don't lose all the layers.
- In layer dialog box select EyeSize layer and Menu-Select-By color, to select circle again.
- Select IrisTexture layer and invert selection. Menu-Select-Invert or Ctrl+I shortcut.
- Menu-Edit-Clear or delte key. Deselect all.
- Menu-File-Export As. Choose .png extention to save image.
Here are reptile eyes!
